Q&A » Frequently Asked Questions » Book Covers »
 Cover Designer Advice (technical specifications)
Added by Brian Schwartz about 7 years ago
Dear Cover Designer,
Thank you for assisting us with your cover design!
Below is a list of important considerations when building a cover for print. We typically start with the eBook edition (requiring front cover only) and then we usually set it up for print with up to 3 different printers.
Note: The ISBN barcodes are automatically added by KDP (after upload) & IngramSpark (w/their template).
2019 Updates
- We can no longer use the same cover template file for both KDP & IngramSpark.
- Please download the cover template for IngramSpark here.
- Download the cover template for KDP here.
2020 Updates
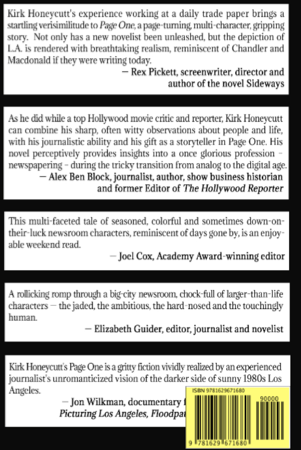
RE: ISBN/Barcode location:
IF the barcode is already part of the back cover, then you can put it anywhere you want. But if you do not include the barcode, KDP will only place it on the spot specified in the cover template (and you can't specify anything different).
Here's an example of a back cover that had to be revised due to not considering the location of the barcode:
IngramSpark: You can put the barcode anywhere you want on the IngramSpark back cover.
Here's the steps KDP provides w/their cover template (How to use the template):
- Open the PDF or PNG file template your image editing software.
- Create a new layer in your image editing software. This layer will serve as the design layer.
- Design your cover in the design layer, using the template PDF or PNG file as the guide layer. The artwork should extend to the outside edge of the template's pink zone to ensure a white border will not exist within the printed work. Do not move the guide layer, as it is properly aligned for our printing specifications.
- Ensure text and/or images that are intended to be read do not appear in the pink zones of the template.
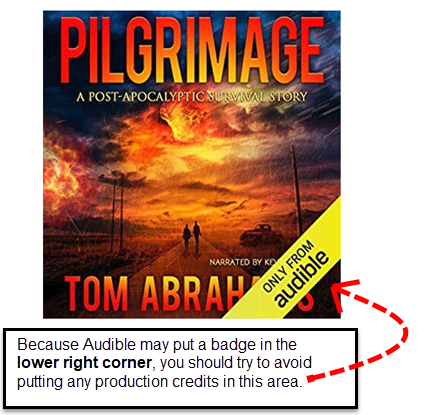
- The barcode area is indicated in yellow on the template. Do not place important images or text intended to be read in the barcode location. We suggest filling in this area with your background color or design. KDP will automatically generate a barcode representing your title’s ISBN when printing copies of your book.
- Once your design is complete, you will need to turn off the guide layer so that it is not printed on your final product or rejected during the review process. If you are unable to turn off the guide layer, then you will need to format the artwork so that it completely covers the guide layer.
- Flatten all layers, save the file as a press quality PDF, and upload the file via KDP.
There's a very good video on youtube that steps through a lot of the details and I highly recommend it: https://youtu.be/u6zRIXw19Jo
An eBook version (front cover only)
From KDP "To ensure the best quality for your image, particularly on high definition devices, the height of the image should be at least 2,500 pixels"
Preferred dimensions (in pixels):
- Kindle Front Cover: 1600 (wide) x 2560 (tall)
- Maximum: 2820 (wide) x 4500 (tall)
- Typical: 1800 (wide) x 2880 (tall)
- Snowfall press (quick turnaround & ARCs - B&W only). No barcode: Pricing & Spine Width Calculator. We can use the same cover file you design for KDP
- KDP (for sale of print books on Amazon). No barcode: You can generate your template here.
- Lightning Source/IngramSpark: _Barcode included with template! Requires that you use their [specific cover template] and know the ISBN number (https://myaccount.ingramspark.com/Portal/Tools/CoverTemplateGenerator).
Printers usually require a PDF/X-1a file. Here are the common issues we run into when a designer does not save as a PDF/X-1a:
- TRANSPARENCY USED ON FILE: When the file contains transparent elements such as drop shadows or opacities less than 100%. Please flatten all layers to eliminate transparent elements. Saving a file using the default PDF/X-1a:2001 setting will eliminate transparencies.
- INVALID BLEND MODE USED CREATING LAYERS WITHIN THE FILE: The file contains blend modes that create layers and may cause elements to print as transparent (blank or missing). Saving a file using the default PDF/X-1a:2001 setting will eliminate this issue.
We can often fix the issue with Adobe Distiller, but it's extra time and we don't always remember to check before we upload. We would prefer you send us the cover spread in a PDF/X-1a:2001 format. If you do have Adobe Distiller, you can create a PDF/X-1a compliant file in 2 steps: Step 1. Step 2. If you are putting text on the spine: 1/16" space is required on either side of the text, and the spine width will vary depending on the paper being used. The ideal cover design for print should be 'flexible' in regards to the spine width. This is due to the fact that different printers use different paper, and depending on the printer used, there will be small fluctuations in the spine width.
- The image should 'wrap' so it's not highly depending on a spine with being 'exact' - because depending on the paper used and the printer selected, the spine width will always vary slightly. Also, we may add or delete pages in the future.
- The text on the spine - note the orientation is important and you need to leave a 1/16" gutter on each side of the text to avoid text spilling over to the front or back cover.
Please Note: CreateSpace limits file size to 40MB - If the PDF you send us is larger than 40MB, we can't use it!
The best designs are one continuous image across the cover spread:

Here is how the cover layout should appear (note that the specific dimensions will vary depending on book size & paper selected):

If we do provide you a cover template, here is a process you can follow (this is also a good procedure to follow regardless):
- Open the PDF, EPS or PNG file provided in your image editing software.
- Create a new layer in your image editing software. This layer will serve as the design layer.
- Design your cover in the design layer, using the template PDF, EPS or PNG file as the guide layer. The artwork should extend to the outside edge of the template's pink zone to ensure a white border will not exist within the printed work. Do not move the guide layer, as it is properly aligned for our printing specifications.
- Ensure text and/or images that are intended to be read do not appear in the pink zones of the template.
- The barcode area is indicated in yellow on the template. Do not place important images or text intending to be read in the barcode location. We suggest filling in this area with your background color or design.
- Once your design is complete, you will need to turn off the guide layer so that it is not printed on your final product or rejected during the review process. If you are unable to turn off the guide layer, then you will need to format the artwork so that it completely covers the guide layer.
- Flatten all layers, save the file as a press quality PDF (PDF XA or X1), and upload the file to us.
We MAY also request a copy of the cover without any text. Doing so will allows us to make changes to the title/subtitle, if needed, without having to hassle you every time we do!
Here's an example:

If you do run into any problems or have questions, don't hesitate to contact us. If it helps to see an example, below are links to print-ready covers that other designers have created for us in the past:
You are welcome to contact me if you have any questions, and thank you for assisting us with your talent!
Audiobook Cover Specs
- Exactly 2400 x 2400 pixels.
- 24-bit (True Color) minimum.
- No smaller than 72 dpi resolution.
- RGB color (not CYMK).
- Images must be a true square, not a rectangular image with borders.
- JPG, PNG, and TIF file formats only.
- Include author name, narrator, and title.
Please also keep in mind the following:
Thank you!
~ Brian